This tutorial will take you through the main steps of visualizing 2D/3D Vector Fields With Three.js.
Vector Fields are a commonly used to visualize flows and currents, for example the flow field around a vehicle or observing magnetic field lines.
Depending on its coordinate system definition we can represent a vector field in different manners.
Today we will look at two approaches:
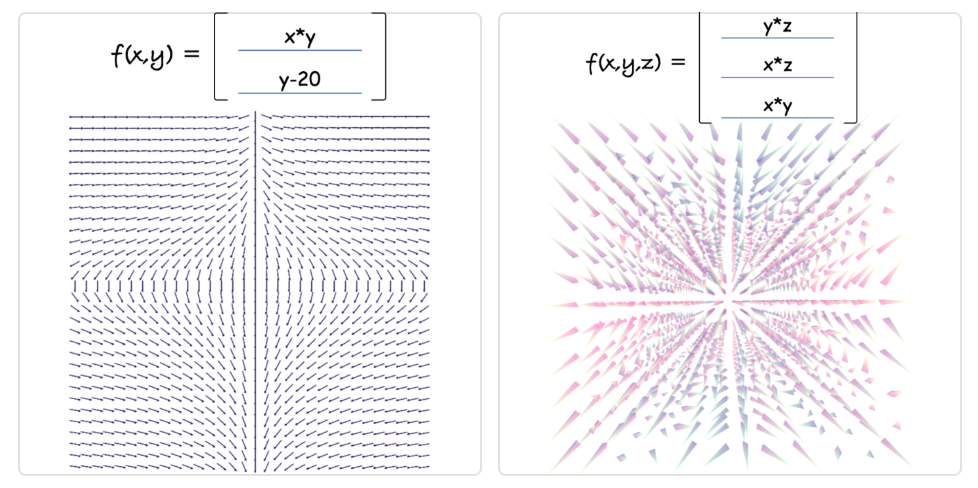
- 2D vector field computing 2 component inputs (
XandY) to a 2 component outputs (XandY) -open full screen demo 2DThen scale it up one dimension
- 3D vector field computing 3 component inputs (
X,YandZ) to a 3 component outputs (X,YandZ) -open full screen demo 3DSo let’s first get started with handling the user input.
Handling User input
Although we use Vue.js for the demo, the framework is not so critical to porting this code into your own project.
What this demo relies on more heavily however is a package to parse the user input and evaluate it as a mathematical expressions.
The package is mathjs, although a bit heavy for a library it is very easy and convenient to use.
For example:
// possible expressions
evaluate("12 / (2.3 + 0.7)"); // 4
evaluate("sin(45 deg) ^ 2"); // 0.5
evaluate("9 / 3 + 2i"); // 3 + 2i
evaluate("det([-1, 2; 3, 1])"); // -7
In our case, it allows us to easily read the value from an input element and convert it to a validated function with 2 or 3 components (2d or 3d):
const text = this.input1.trim().toLowerCase();
const input = `f(x, y, z) = ${text}`;
try {
  this.input1Func = evaluate(input);
  this.sendToTracer();
} catch (error) {
  this.input1Func = null;
}
Now we can use these defined functions to generate each arrow direction at X, Y and Z by mapping each components. next let’s look at how we can render them efficiently.
WebGL particles
With efficiency in mind, we will be rendering the arrows of our vector fields using WebGL geometry instancing.
If you are not familiar with it is, it is a way of initializing a multiple mesh instances from a single geometry buffer. It allows us to draw all these arrows in a single draw call and offers great performance.
Note that both versions of our vector fields today rely on this same technique with the only differences being that the first one is 2D and therefore uses a plane geometry with an arrow texture and an Orthographic camera; while the 3D version uses a cone geometry to indicate the direction of the vector and a Perspective camera.
Keep in mind: although we are not covering the entire code in this tutorial, you can access the complete code base on github as well as the boilerplate code for geometry instancing on threejs examples page
Initial properties
In order to generate the grid positions we need to loop over as many dimension as needed.
In the 2D version we would use a 2D loop over two axis X and Y while in the 3D demo we add a third dimension (Z) and nest another loop:
const stepSize = 8;
const halfStep = stepSize / 2;
for (let z = 0; z < numberOfBuckets; z += 1) {
  for (let y = 0; y < numberOfRows; y += 1) {
    for (let x = 0; x < numberOfColumns; x += 1) {
      // set the position on the grid
      offsets.push(
        -offsetX + x * stepSize + halfStep,
        -offsetY + y * stepSize + halfStep,
        -offsetZ + z * stepSize + halfStep
      );
      // set orientation in 3D space using Quaternions
      _q.set(0, 0, 0, 0).normalize();
      orientations.push(_q.x, _q.y, _q.z, _q.w);
      // save the index location on the grid, can be useful later for different renderings per axis
      gridXYZs.push(x, y, z);
      // initializing to a random color
      colors.push(Math.random(), Math.random(), Math.random());
      // define the scale, for example based on step size
      scales.push(stepSize / 8);
    }
  }
}
Once everything is initialized The next step is to update each arrow with a vector value that we translate as the arrow orientation.
For the complete initialization of the particles, see the full code here
2D Vector Fields
In 2D it’s fairly simple, when the user input functions change, we call updateFunctions and use basic trigonometry with Math.atan2.
updateFunctions (op1, op2) {
  const angles = this.geometry.attributes.angle.array
  let i = 0
  for (let y = 0; y < numberOfRows; y += 1) {
    for (let x = 0; x < numberOfColumns; x += 1) {
      const res1 = op1(x - numberOfColumns/2, y - numberOfRows/2)
      const res2 = op2(x - numberOfColumns/2, y - numberOfRows/2)
      angles[i] = Math.atan2(res1, res2)
      i += 1
    }
  }
  this.geometry.attributes.angle.needsUpdate = true
}
Change the values below to update the result:
3D Vector Fields
When working with 3D we still use the same approach but on top of calculating the yaw value, we also need to account for the third axis and calculate the pitch.
To make it easier, we use Three.js implementations of Euler and Quaternion.
updateFunctions (op1, op2, op3) {
  const orientations = this.geometry.attributes.orientation.array
  let i4 = 0
  for (let z = 0; z < numberOfBuckets; z += 1) {
    for (let y = 0; y < numberOfRows; y += 1) {
      for (let x = 0; x < numberOfColumns; x += 1) {
        const res1 = op1(x - numberOfColumns/2, y - numberOfRows/2, z - numberOfBuckets/2)
        const res2 = op2(x - numberOfColumns/2, y - numberOfRows/2, z - numberOfBuckets/2)
        const res3 = op3(x - numberOfColumns/2, y - numberOfRows/2, z - numberOfBuckets/2)
        const pitch = Math.asin(res3);
        const yaw = -Math.atan2(res1, res2)
        _q.setFromEuler(new Euler(pitch, 0, yaw, 'XYZ'))
        orientations[i4 + 0] = _q.x
        orientations[i4 + 1] = _q.y
        orientations[i4 + 2] = _q.z
        orientations[i4 + 3] = _q.w
        i4 += 4
      }
    }
  }
  this.geometry.attributes.orientation.needsUpdate = true
}
Change the values below to update the result:
That’s about it! Hope you enjoyed this tutorial, if you have any question or comment, please use the section below or reach out on twitter. Enjoy!