In this tutorial, we create a 3D scene with an animated character and an outline post-processing effect.
Prepare the 3D Model
For this tutorial we need an animated 3D model to play with. As the process of creating a model from scratch is a whole different tutorial, we will use an open source model designed by @quaternius from one of the most awesome creative communities on the Web: OpenGameArt.org
Next we need to use a 3D modeling software to edit and re-export the model to glTF Web format. So if you haven’t already go ahead and install Blender 3D - it’s insanely well made, super powerful and free!
I’ll be using Blender 2.8 in this tutorial so be aware the UI might look a bit different when you read this.<
If it’s your first time using Blender and you’re feeling overwhelmed: don’t panic! Not only there are plenty of resources out there. You can also skip this entire step by just downloading the .glb file and go to the next section
So let’s go ahead and download the 3D model zip file. Once the archive is extracted, navigate to the blender directory and open the .blend.
- First we open the workspace in animator mode by clicking the
Animationbutton at the top of the screen:
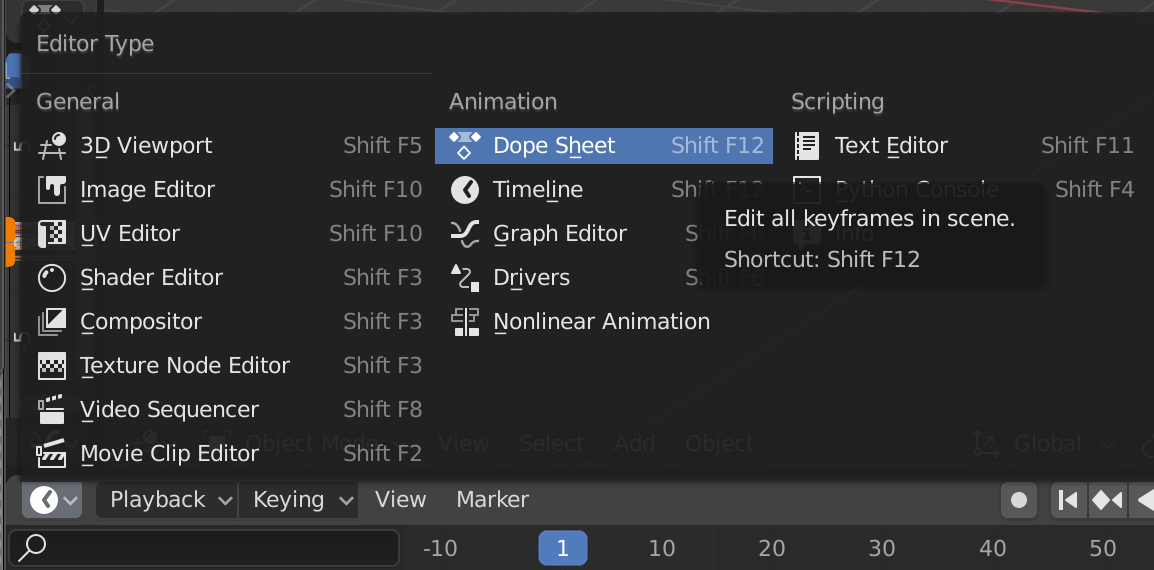
- Next at the bottom left of your screen click on the initially timeline icon and select
Dope Sheetmenu:
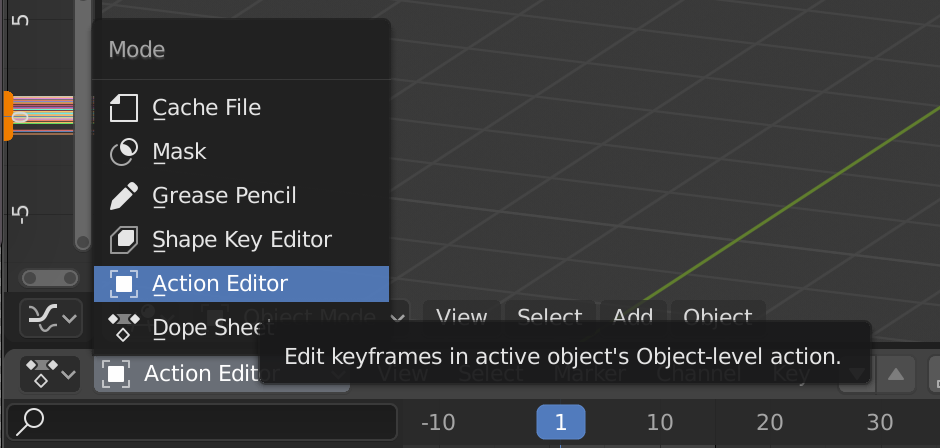
- On the right side of the previous drop down you should now see another drop down, go ahead and select
Action Editor
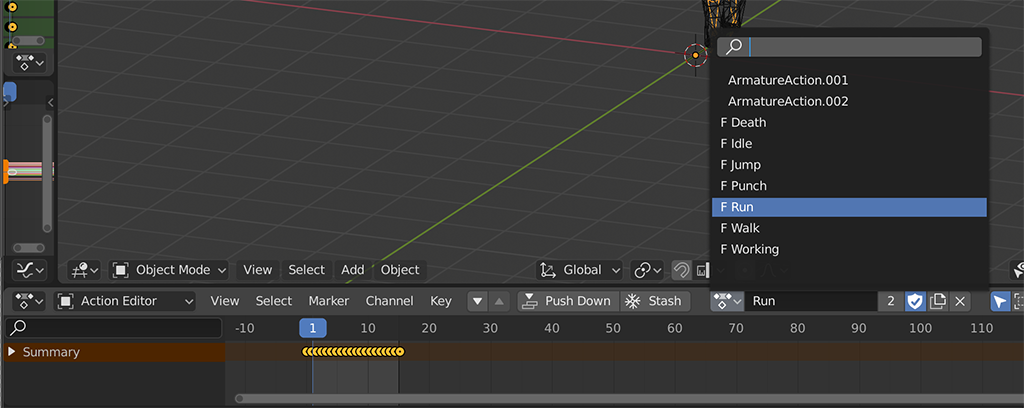
- And yep, another dropdown just appeared on the right side, not confusing at all I know… You can now see the different animations available, select them and edit them as you like. What i did for my demo is deleting the other animations as I only need the
Runone and would prefer a smaller file size.
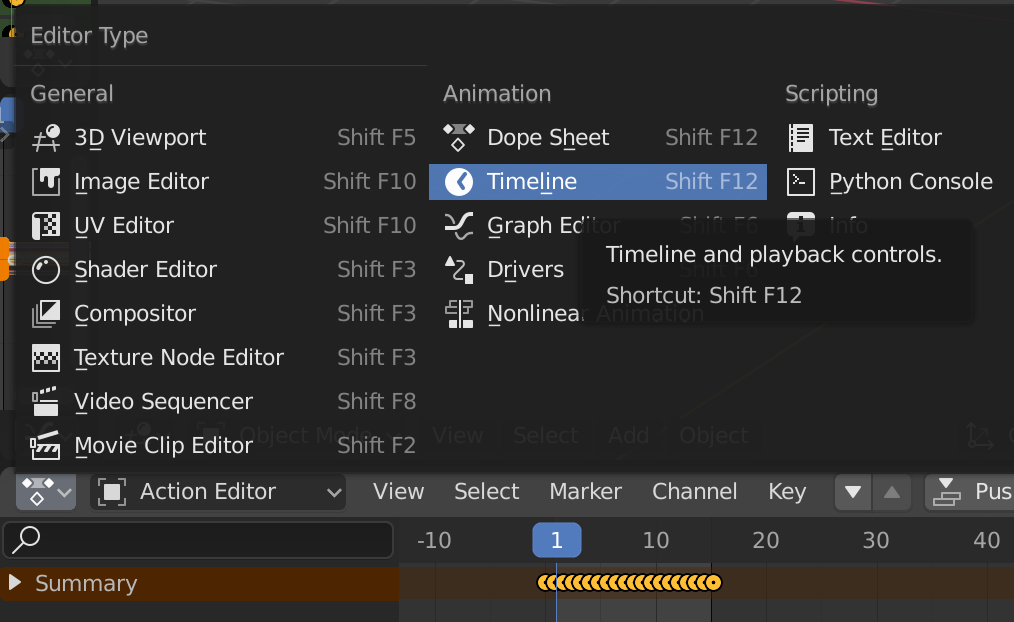
- Now go back to the timeline menu again by clicking on the
Dope Sheeticon on the bottom left of your screen and select theTimelinemenu:
- On the right side of this menu, we want to set the first and last frame number of our animation. This is imprtant as Blender needs to know how many animation farmes to export. The
Runanimation has16frames in total[0-15], but because the first and last frames are the same we will loop from1to15.

From Blender to Three via GLTF
glTF (GL Transmission Format) is a format commonly used on the web; it reduces the size of 3D models and the runtime processing needed to unpack and render those models.
- In blender you can export the model to glTF format from the
Filemenu: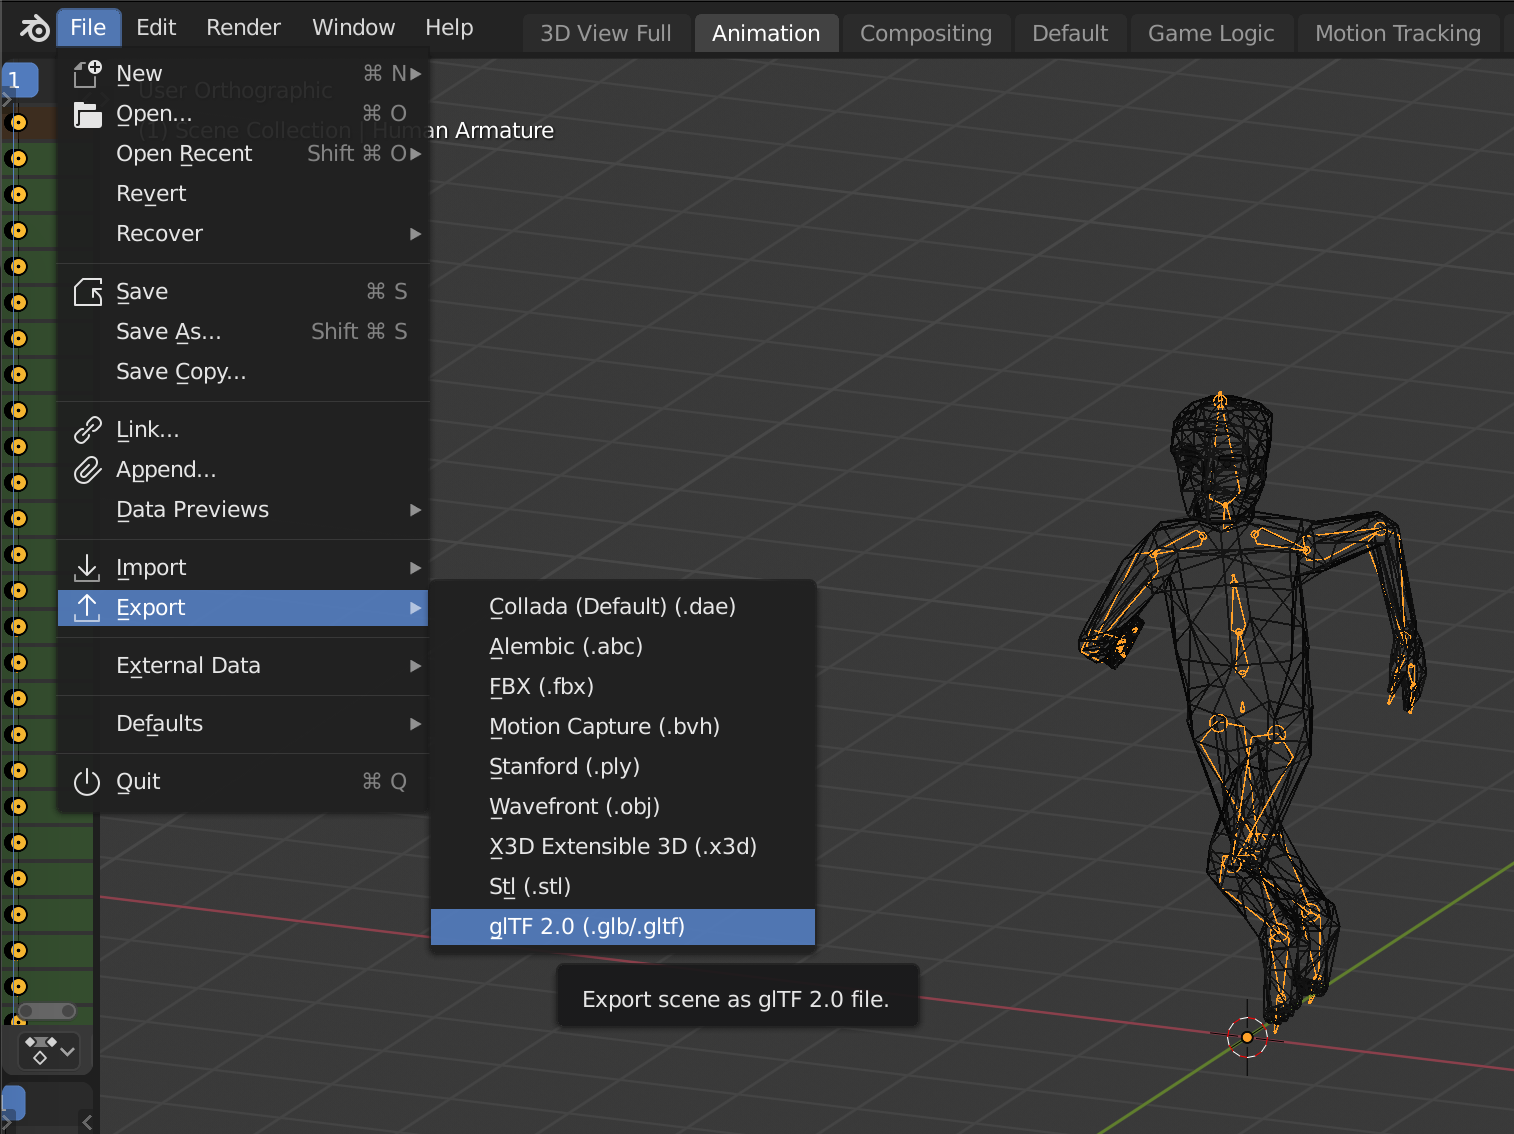
- The default settings are good to go, just make sure the animation is enabled:
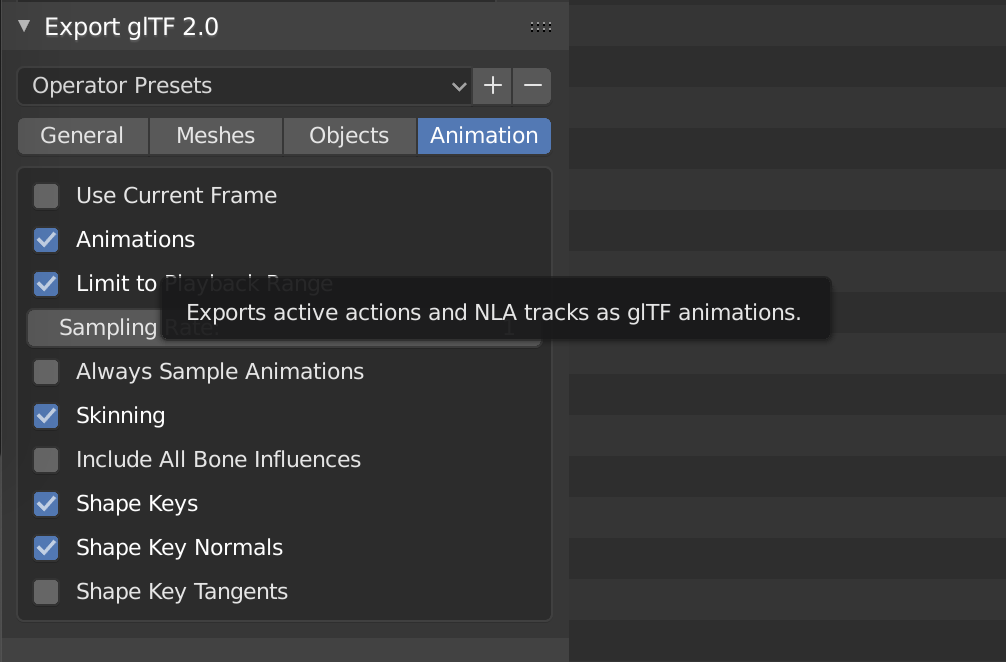
That’s it, we now have a runner.glb ready to be loaded in our Three.js Web application.
Frontend Setup
Because I am used to work with Vue js and really enjoy it, i tend to use the vue-cli for other non-vue projects. It handles the webpack config for me, provides a great dev and release workflow. Feel free to use whatever workflow you are comfortable with or just follow along with my very opinionated version:
- Let’s first install the CLI
npm i --global @vue/cli- We use
vue-clito generate the project base. Make sure to select SCSS post processor option (using the space bar)
vue create some-project-name- The project is created and vue cli already has installed the dependencies for us (no need to run
npm installagain), all we have left to do is enter the directory and add three.js to the project.
cd some-project-name
npm i three
Ready to dev!
Open the project in VisualStudioCode (i mean you don’t have to but it’s just a nice IDE if you haven’t tried it already) then start the dev server:
code .
npm run serve
Cleanup default files
Because we’re actually not going to be using Vue in this project we can delete the following:
-
components/directory -
App.vue -
delete the code inside
main.js -
delete the vue logo in the assets directory (or feel free to keep it if you love Vue like i do)
Create main CSS layout file styles.scss.
We’re using a paper texture as a background image and resize it to fit the width and height of the viewport (using 100vw and 100vh).
The canvas fills the screen while maintaining a 2% margin that matches the background image and makes the canvas fit right over the sheet of paper in a responsive manner.
Although it is based on the entire viewport, it could easily be refactored to be fitting within any container.
body {
  margin: 0;
  padding: 0;
  border: none;
  position: relative;
  width: 100vw;
  min-height: 100vh;
  background-image: url(./paper.jpg);
  background-repeat: no-repeat;
  background-position: center;
  background-size: 100% 100%;
  *,
  *:focus {
    outline: none;
  }
  canvas {
    margin: 0;
    padding: 0;
    border: none;
    width: 96vw;
    min-height: 96vh;
    position: absolute;
    top: 2%;
    left: 2%;
    background: transparent;
    user-select: none;
  }
}
Back to main.js.
This is the entry point of the app, when the page loads, the first thing we need to do is loading the 3D model using the GLTFLoader provided by Three.js examples. Once ready we launch a custom class Stage3D that we will use later on to manage the 3D scene.
// import SCSS spritesheet for basic layout setup
import "./style.scss";
// The loader library is provided by Threejs
import { GLTFLoader } from "three/examples/jsm/loaders/GLTFLoader";
// This is a custom class we will create next to manage the 3D scene
import Stage3D from "./Stage3D";

/** Load a GLTF file for Threejs */
function loadGLTF(modelName) {
  const loader = new GLTFLoader().setPath(process.env.BASE_URL + "models/");
  return new Promise((accept) => {
    loader.load(
      modelName,
      (gltf) => {
        accept(gltf);
      },
      (xhr) => {
        // loadingProgress = xhr.loaded / xhr.total
      }
    );
  });
}

/** Once the assets are loaded we launch the app */
function start(gltf) {
  const container = document.querySelector("#app");
  const stage = new Stage3D(container, gltf);
}

/** Let's go! */
loadGLTF("running-man.glb").then(start);
Stage3D - now we’re coding!
This main class will contain the usual three js boilerplate code:
-
Import dependencies
-
Initialize
-
create a camera, a scene and a renderer
-
create a floor mesh to project the shadow using
ShadowMaterial -
create a human mesh and add to the scene
-
Add
OrbitControlsto be able to drag the scene with mouse handle scene resize event handle the loop
-
Today we will go the extra mile by adding the following:
-
Initialize a DirectionalLight to generate shadows
-
Setup a composer post-processing pipeline to draw the human outline
import {
  Clock,
  DirectionalLight,
  PerspectiveCamera,
  Scene,
  Vector2,
  WebGLRenderer,
  Mesh,
  PlaneGeometry,
  ShadowMaterial,
} from "three";
import { EffectComposer } from "three/examples/jsm/postprocessing/EffectComposer";
import { OrbitControls } from "three/examples/jsm/controls/OrbitControls";
import { RenderPass } from "three/examples/jsm/postprocessing/RenderPass";
import Human from "./Human";
import { OutlinePass } from "./OutlinePass";

export default class Stage3D {
  constructor(container, gltf) {
    this.container = container;

    this.createEngine();
    this.createLights();
    this.initPostProcessing();

    this.human = new Human(gltf);
    this.scene.add(this.human.mesh);
    // let the outline pass know which element to draw
    this.outlinePass.selectedObjects = [this.human.mesh];

    this.floor = new Mesh(
      new PlaneGeometry(1000, 1000, 1, 1),
      new ShadowMaterial({
        color: 0x000066,
      })
    );
    this.floor.rotateX(-Math.PI / 2);
    this.floor.castShadow = false;
    this.floor.receiveShadow = true;
    this.scene.add(this.floor);

    // Enable user controls
    this.controls = new OrbitControls(this.camera, this.renderer.domElement);

    // trigger resize event to make sure everything is resized and ready
    this.handleWindowResize();

    // start looping
    this.loop();
  }

  // here use arrow function to give the right scope to the callback
  loop = () => {
    window.requestAnimationFrame(this.loop);
    this.controls.update();
    const delta = Math.max(0, Math.min(1, this.clock.getDelta()));
    this.human.update(delta, this.clock.elapsedTime);
    this.composer.render();
  };

  createEngine() {
    this.scene = new Scene();

    const aspectRatio = this.stageWidth / this.stageHeight;
    const fieldOfView = 40;
    const nearPlane = 1;
    const farPlane = 1500;
    this.camera = new PerspectiveCamera(
      fieldOfView,
      aspectRatio,
      nearPlane,
      farPlane
    );

    this.renderer = new WebGLRenderer({
      antialias: true, // smoother edges
      alpha: true, // this setting allows transparency
    });
    // support higher res displays
    this.renderer.setPixelRatio(window.devicePixelRatio);
    // transparent background
    this.renderer.setClearColor(0xffffff, 0);
    // enable shadows
    this.renderer.shadowMap.enabled = true;
    // append the canvas element to the div#app created by vue-cli (container)
    this.container.appendChild(this.renderer.domElement);
    // watch for screen resize
    window.addEventListener("resize", this.handleWindowResize, false);
  }

  handleWindowResize = () => {
    const width = window.innerWidth * 0.96; // + 2% margin on both sides in CSS
    const height = window.innerHeight * 0.96; // + 2% margin on both sides in CSS
    // alternatively the canvas could be contained in an element
    // const {width, height} = this.renderer.domElement.getBoundingClientRect()
    this.stageWidth = width;
    this.stageHeight = height;
    this.renderer.setSize(this.stageWidth, this.stageHeight);
    this.camera.aspect = this.stageWidth / this.stageHeight;
    this.camera.updateProjectionMatrix();
    // update the size for the composer as well
    this.composer.setSize(this.stageWidth, this.stageHeight);
  };

  createLights() {
    // see - 6 - Lighting and Shadows
  }

  initPostProcessing() {
    // see - 7 - Post-Processing and Outline Effect
  }
}
Model Animation
The Human class is a container for the human mesh and its animation tracks. the code below gets initialized with the glTF payload and initiates the ’Run’ animation.
Here we have an challenging rendering problem because we want to generate a shadow from a transparent outline. The trick is to enable transparency on the mesh and set the opacity to 0, This way the model is not visible on the scene meanwhile the shadow is rendered properly.
Also important when working with animation is to enable skinning!
The function fadeToAction allows transitioning from one animation track to another. You can find a more extended example in threejs skinning morph example page. In this demo we’re only using the Run animation track so all we got left to do is to set it once and loop it forever.
import { AnimationMixer, LoopOnce, LoopRepeat, MeshBasicMaterial } from "three";

export default class Human {
  constructor(gltf) {
    this.mesh = gltf.scenes[0].children[0];

    this.mesh.traverse((child) => {
      if (child.isMesh) {
        child.material = new MeshBasicMaterial({
          skinning: true,
          transparent: true,
          opacity: 0,
        });
        child.castShadow = true;
        child.receiveShadow = true;
      }
    });

    this.animationMixer = new AnimationMixer(this.mesh);
    this.actions = {};
    for (var i = 0; i < gltf.animations.length; i++) {
      var clip = gltf.animations[i];
      var action = this.animationMixer.clipAction(clip);
      this.actions[clip.name] = this.actions[clip.name] || action;
    }

    this.fadeToAction("Run", 0, LoopRepeat, 0.75, 1, true);
  }

  fadeToAction(
    name,
    duration,
    loop = LoopOnce,
    timeScale = 1,
    weight = 1,
    clampWhenFinished = true
  ) {
    this.previousAction = this.activeAction;
    this.activeAction = this.actions[name];
    if (this.previousAction && this.previousAction !== this.activeAction) {
      this.previousAction.fadeOut(duration);
    }
    this.activeAction.loop = loop;
    this.activeAction.reset();
    this.activeAction.clampWhenFinished = clampWhenFinished;
    this.activeAction.setEffectiveTimeScale(timeScale);
    this.activeAction.setEffectiveWeight(weight);
    this.activeAction.fadeIn(duration);
    this.activeAction.play();
  }

  update(delta, lifetime) {
    this.animationMixer.update(delta);
  }
}
Lighting and Shadows
Lighting a scene in Three.js would most often require light types such as HemisphereLight or AmbientLight. However in this project the canvas is transparent, all we care about really is to be able to generate a shadow from the running model.
So we use a DirectionalLight which shines in a specific direction and all its produced rays are parallel.
Depending on the size of your scene, you may need to adjust the shadowLight shadow camera settings and mapSize to adjust performance against higher resolution.
createLights () {
  this.shadowLight = new DirectionalLight(0xffffff, 1)

  this.shadowLight.position.set(15, 15, 10)
  this.shadowLight.lookAt(0,0,0)

  // Allow shadow casting
  this.shadowLight.castShadow = true

  // define the visible area of the projected shadow
  this.shadowLight.shadow.camera.left = -20
  this.shadowLight.shadow.camera.right = 20
  this.shadowLight.shadow.camera.top = 20
  this.shadowLight.shadow.camera.bottom = -20

  this.shadowLight.shadow.camera.near = 1
  this.shadowLight.shadow.camera.far = 100

  // while increasing the size will improve quality,
  // it will also decrease performance
  this.shadowLight.shadow.mapSize.width = 512
  this.shadowLight.shadow.mapSize.height = 512

  this.scene.add(this.shadowLight)
}
Post-Processing and Outline Effect
The code for this example is inspired from this three.js example
The composer initialization is pretty straightforward:
create the effect composer
create the main render pass and add it to the composer
create the outlinePass and add it to the composer
initPostProcessing () {
  // init the postprocessing pipeline
  this.composer = new EffectComposer(this.renderer)
  // main render pass for the 3d model and shadows
  const renderPass = new RenderPass(this.scene, this.camera)
  // add the render pass to composer pipeline
  this.composer.addPass(renderPass)
  // outline pass
  this.outlinePass = new OutlinePass(new Vector2(window.innerWidth * 0.96, window.innerHeight * 0.96), this.scene, this.camera)
  // we only want the outline on the human model, not the floor
  this.outlinePass.selectedObjects = [this.scene]
  // add the outline pass to composer pipeline
  this.composer.addPass(this.outlinePass)
}
If you’re looking into the original three.js example you may notice the MaskMaterial uses a custom ShaderManterial instance which must enable skinning for the animation to work, see it in the code
getPrepareMaskMaterial () {
  return new ShaderMaterial({
    skinning: true,
    uniforms: ...,
    fragmentShader: ...,
    vertexShader: ...,
  })
}
That’s it for now
Chekcout the demo or the source code on github
Hope you enjoyed this tutorial, if you have any question or comment, please use the section below or reach out on twitter. Enjoy!