This demo was essentially made possible by the WebAssembly Google project LiquidFun.js.
This tutorial will take you through the long but fun journey of making the demo above, while going over the following main steps:
Keep in mind: although we are not covering the entire code in this tutorial, you can access the complete code base on github and if all you want is play with the penguins here is the demo page
Intro
The demo today is barely Javascript:
Rendering handled by the GPU - WebGL - Three.js
Physics processed natively - Box2D - WebAssembly - via LiquidFun.js
… Sorry Javascript, you’re just going to be the third wheel today
WebAssembly (often shortened to Wasm) is an open standard that defines a portable binary-code format for executable programs. It enables high-performance applications on web pages.
LiquidFunis the 2D rigid-body and fluid simulation C++ library based uponBox2Dtranspiled to JS usingWasm.
Although it is a fairly newly implemented standard, it is now ready to use on most platforms.
While it’s now working on most platforms, it is not yet the easiest to setup and get started with so let’s dive into it next.
1 - Project Setup
So maybe you have a strong background in C++ and compilers, then you might want to look into compiling your own version of LiquidFun. It probably would be a good idea since the package is currently 750KB of javascript, but that’s another battle.
For now we’ll go ahead and download the latest release - which at the time of writing this tutorial is
v1.1.0
Next we need to define a project workflow, a way to do dev work while being able to deploy our work as a static build easily. For that we use the best tool available: Vue CLI. If you have a preference for other frameworks rest assured this is not what matters here as the code uses ES6 modules which can easily be executed in other dev flows.
So let’s get started and open terminal and install the Vue CLI if not already and create a project, then cd into and install Three.js
npm i --global @vue/cli
vue create your-project-name
cd your-project-name
npm i three
Adding liquidfun.js
To give you some context, it starts from the Box2D documentation:
“Most of the types defined in the engine begin with the b2 prefix. Hopefully this is sufficient to avoid name clashing with your game engine.” source
Or maybe it is Wasm to be blamed:
“While there are future plans to allow WebAssembly modules to be loaded just like ES6 modules, WebAssembly must currently be loaded and compiled by JavaScript.” source
As one would expect, the same issues trickle down to LiquidFun as it heavily relies on the global scope (window).
When working with a moderm workflow it can be problematic for many reasons:
- WebPack will complain it can’t parse it
- ESLint will be confused and get angry at you
- Forget about Hot Module Replacement
First we fix the easy one by disabling HMR in vue.config.js but making sure LiveReload remains enabled:
module.exports = {
  // other stuff...
  devServer: {
    hot: false,
    liveReload: true,
  },
};
Ok now our page reloads properly and the window is recreated every time we update our code to prevent errors and spining fans.
The next step for this proposed approach is to host liquidfun.js file in the /public/vendors/ directory and load it traditionally with a script tag from the HTML at run time.
When loading it traditionally with a script tag however, it is important to include it before the other JS imports created by Webpack - see the full template file:
<link href="<%= BASE_URL %>vendors/liquidfun.js" rel="preload" as="script" />So you’d think we loaded the library and we’re ready to go, well wait a second! If we try referencing any Box2D object from our app such as b2World, we get nasty Webpack errors telling us it can’t find it. That is because we never never formerly introduced LiquidFun to Webpack, in fact because we load the dependency ourselves with the script tag, liquidfun is not mentioned at all in package.json so the library is just not found.
Luckily WebPack comes with a great option Externals also supported in Vue CLI.
Now Webpack knows about liquidfun and seems to run properly.
And here comes angry ESLint! THE VARIABLE YOU ARE TRYING TO USE IS UNDEFINED!!!!
At this point the doc don’t seem to solve it so out of frustration we remove externals from the config and instead we trick both Webpack and ESLint into thinking the project is setup properly by creating a module ExternalsResolver.js acting as proxy to the window references.
export const b2World = window["b2World"];
export const b2_tensileParticle = window["b2_tensileParticle"];
export const b2_dynamicBody = window["b2_dynamicBody"];
export const b2PolygonShape = window["b2PolygonShape"];
export const b2CircleShape = window["b2CircleShape"];
export const b2Vec2 = window["b2Vec2"];
export const b2BodyDef = window["b2BodyDef"];
export const b2ParticleSystemDef = window["b2ParticleSystemDef"];
export const b2ParticleGroupDef = window["b2ParticleGroupDef"];
export const b2_waterParticle = window["b2_waterParticle"];
export const b2_colorMixingParticle = window["b2_colorMixingParticle"];
export const b2MouseJointDef = window["b2MouseJointDef"];
export const b2AABB = window["b2AABB"];
This solution may not be the most standard but it does the job. Also in the long run when a modular version of liquidfun is released, it should be easy to swap out.
So this is good enough for now, our environment is ready!
Ready to dev!
First we prepare the main app container which is going to be Vue. The main App component will be responsible for creating the DOM element (canvas) and connecting it with our small engine.
import Stage from "./engine/Stage";
export default {
  name: "App",
  data: () => ({
    cameraMode: "full",
  }),
  mounted() {
    Stage.initialize(this.$refs["canvas-container"], this.cameraMode);
  },
  beforeDestroy() {
    Stage.destroy();
  },
  methods: {
    toggleCameraMode() {
      this.cameraMode = this.cameraMode === "follow" ? "full" : "follow";
      Stage.setcameraMode(this.cameraMode);
    },
  },
};
The main Vue app can control the engine with 3 main commands
-
Stage.initializeto initialize the engine, obviously -
Stage.setcameraModeto change the camera behavior -
Stage.destroyto clean up when unloading
To get a cleaner API feel for our engine, the main class Stage.js is a loose but handy implementation of a Singleton class:
export default class Stage {

  static instance = null

  static initialize (container, cameraMode) {
    if (!Stage.instance) {
      Stage.instance = new Stage(container, cameraMode)
    }
  }

  static destroy () {
    Stage.instance && Stage.instance.destroy()
  }

  static setcameraMode (mode) {
    Stage.instance && Stage.instance.setcameraMode(mode)
  }

  // ...
  constructor (container, cameraMode) {
    // ...
This level of abstraction could be skipped but I personally find it useful for reusability and also when coming back to your code 6 months later, it’s easier to read and get a better perspective on the code structure and intents.
So now we have built our backbone, we can start looking into the different components of our engine:
We’ll cover the most important aspects of each one of them but first!
As we go through this tutorial, a term/concept is going to come up a few times:
buffer.
Because we're dealing with particles and are looking for high performance, we manipulate elements using buffers, or vectors depending on your background.
It can seem somewhat mind bending if you're new to it at first, but the idea in a nut shell:
Instead of creating an object per particle, with each object having its own properties, we flip the structure and create buffers per properties, where the particle lives at a specific index in an array.
Particles as Objects:
Particles as Buffers:
This was important to insist on because we'll mostly use anObjectapproach from Javascript, but we'll always need to communicate with WebAssembly and WebGL by sharingbuffers.

2 - Rendering, from WebAssembly to WebGL
Our renderer extends THREE.WebGLRenderer. If you have used Three.js before, you will find nothing new, boiler plate initialization as usual.
import { WebGLRenderer } from "three";
export default class Renderer extends WebGLRenderer {
  constructor() {
    super({
      antialias: false, // for performance
      alpha: true,
    });
    this.setClearColor(0, 0);
    this.setSize(this.windowWidth, this.windowHeight);
    this.setPixelRatio(window.devicePixelRatio);
    this.shadowMap.enabled = false;
    const gl = this.getContext();
    if (!gl.getExtension("OES_texture_float")) {
      alert("client support error - float textures not supported");
      throw new Error("float textures not supported");
    }
    // we need to access textures from within the vertex shader
    // https://github.com/KhronosGroup/WebGL/blob/90ceaac0c4546b1aad634a6a5c4d2dfae9f4d124/conformance-suites/1.0.0/extra/webgl-info.html
    if (gl.getParameter(gl.MAX_VERTEX_TEXTURE_IMAGE_UNITS) === 0) {
      alert("client support error - vertex shader cannot read textures");
      throw new Error("vertex shader cannot read textures");
    }
  }
}
As usual we create a camera
this.camera = new PerspectiveCamera(
  /* fov */ 70,
  /* aspect */ window.innerWidth / window.innerHeight,
  /* near */ 0.001,
  /* far */ 50
);
The one difference here is that instead of simply creating one Scene object, we create 3:
this.sceneBackground = new Scene();
this.sceneLiquid = new Scene();
this.sceneForeground = new Scene();
Each scene will be rendered separately with our composer, more on that later.
Now our main rendering engine is setup we need a way to translate our Box2D simulated bodies onto a mesh coordinates we can render on the screen.
Let’s first take a look at the DebugLayer.js which is mostly a copy of the LiquidFun example rendeder
Remember when I said buffers we important to understand? Well there it goes! Here is how we draw a line by:
-
appending 3 components (
x,y,z) on thepositionsbuffer -
appending 3 components (
r,g,b) on thecolorsbuffer -
All of it at a specific
currentVertexindex
insertLine (x1, y1, x2, y2, r, g, b) {
  var i = this.currentVertex
  var threeI = i * 3
  this.positions[threeI] = x1
  this.positions[threeI + 1] = y1
  this.positions[threeI + 2] = 0
  this.colors[threeI] = r
  this.colors[threeI + 1] = g
  this.colors[threeI + 2] = b

  i += 1
  threeI = i * 3
  this.positions[threeI] = x2
  this.positions[threeI + 1] = y2
  this.positions[threeI + 2] = 0
  this.colors[threeI] = r
  this.colors[threeI + 1] = g
  this.colors[threeI + 2] = b
  this.currentVertex += 2
}
All our code needs to do to draw then is to move the values from Box2D buffers to our Three buffers.
b2PolygonShape.prototype.draw = function (transform) {
  const zPosition = renderer.currentVertex * 3;
  renderer.transformVerticesAndInsert(this.vertices, transform, 0, 0, 0);
  // create a loop
  const positions = renderer.positions;
  const last = (renderer.currentVertex - 1) * 3;
  renderer.insertLine(
    positions[last],
    positions[last + 1],
    positions[zPosition],
    positions[zPosition + 1],
    0,
    0,
    0
  );
};
This is just the basics, there is more cases and examples available but in short the idea is simply, on every frame event, to copy the transform buffers from WebAssembly to WebGL.
This simple renderer is provided by liquidfun examples and for our project we want to do something more advanced.
-
so next we ‘ll look into how we connect our Box2D bodies to ThreeJS sprites,
-
later on how to create a water simulation using instanced particle rendering and post processing.
3 - Static shapes and dynamic bodies (penguins)
Box2D offers two main types of objects to work with: Static and dynamic bodies.
Static bodieshave no velocity and are fixed in space. They are generally used to create wall and floor surfaces.
Dynamic bodieshave linear and circular velocities which makes them behave in a realistic manner. They can be used for any object definitions such as a ragdoll, or as part of a particle system.
Bodies have a whole collection of settings to define their physics properties such as density, restitution, friction AND EVEN collisionFilter which allows to set specific collision rules per object types. For example in a shooting game, the hero and the enemies would collide with bullets (getting shot), however only the hero could pick up power ups and enemies would just pass by without collecting it.
Similar to a 3D model, body shapes are represented using vertices, but in two dimensions only (x,y). It is defined by a collection of points. For example this is how we define the walls in the demo.
export const walls = [
  // starts top left to right bottom
  [
    [ -16, 26 ],
    [ -16, 25 ],
    [ 10, 20 ],
    [ 10, 21 ],
  ],
  [
    [ 19, 21 ],
    [ 19, 20 ],
    [ 5, 12 ],
    [ 5, 13 ],
  ],
  ...
  ],
  // main ground part
  [
    [ 0, -10 ],
    [ -20, -9 ],
    [ 0, -8 ],
    [ 20, -9 ],
  ]
]
Then we create the body definition with Javascript:
makeWalls() {
  const def = new b2BodyDef()
  const ground = this.world.CreateBody(def)
  for (let wall of walls) {
    const shape = new b2PolygonShape()
    for (let xy of wall) {
      shape.vertices.push(new b2Vec2(...xy))
    }
    ground.CreateFixtureFromShape(shape, 0.0)
  }
}
There is of course more to it, for example your shape definitions should not contain any concave polygons and instead be split into different convex polygons. But that’s a whole more complex episode.
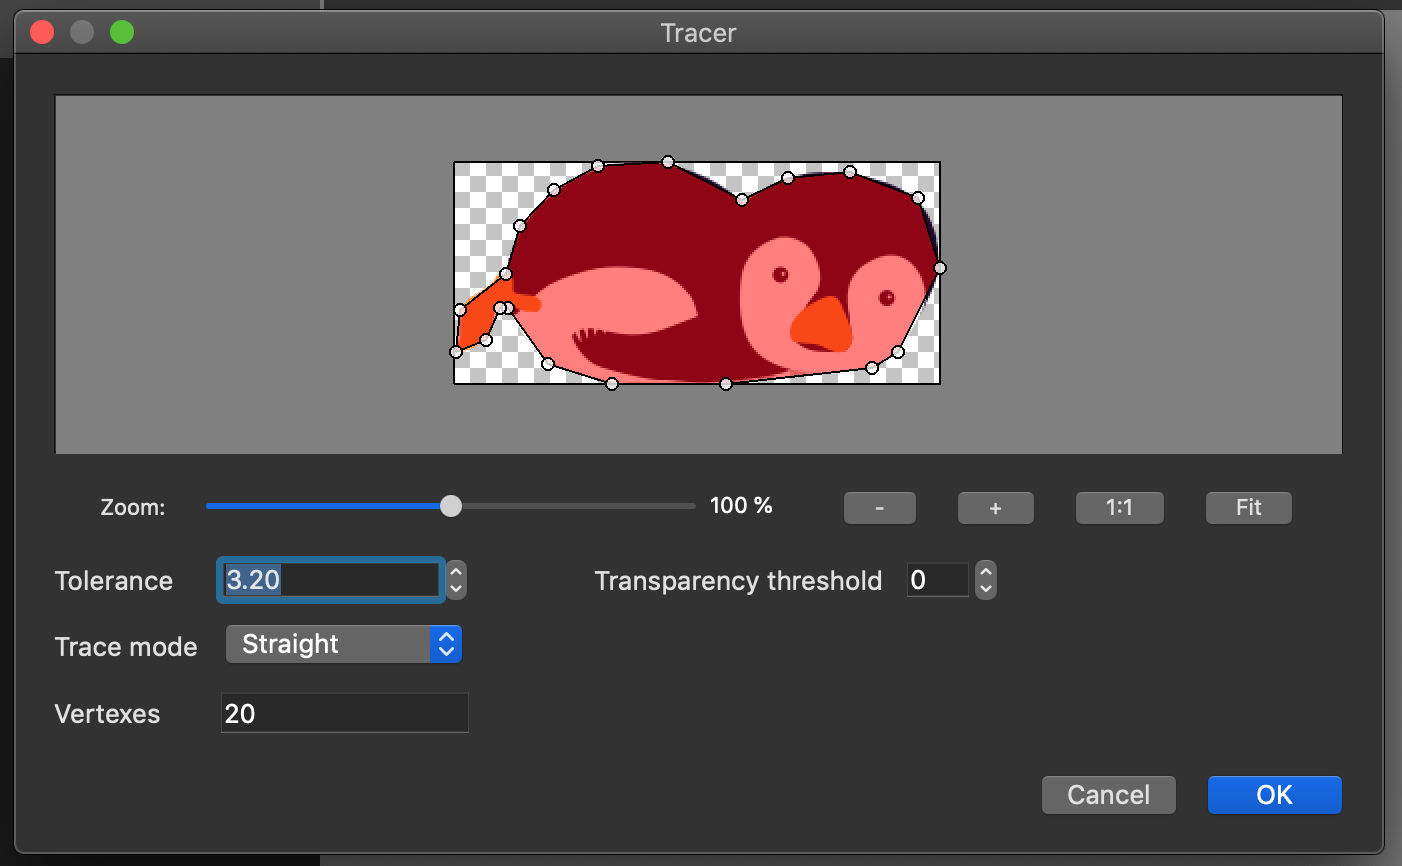
To avoid running into such situation, we use a tool called Physics Editor
Go ahead and
download it, it's free to use for a week and very cheap if you decide buying a license.
The software is very easy and intuitive to use, the image below demonstrate the automatic shape creation tool.
In the free demo of Physics Editor, you can chose to export for the library matter.js which we are not using today (although it’s worth checking out if you want to do 2D physics without WebAssembly).
This will output a .json file that we will loaded later on by our simulation to create the penguin body.
makePengiuns (numberOfPenguins) {
    const penguinVertices = penguin.fixtures[0].vertices
    const scale = 0.014
    let bd = new b2BodyDef()
    bd.type = b2_dynamicBody
    bd.sleep = false
    for (let i = 0; i < numberOfPenguins; i++) {
      let body = this.world.CreateBody(bd)
      for (let triangle of penguinVertices) {
        const shape = new b2PolygonShape;
        for (let vertice of triangle) {
          shape.vertices.push(new b2Vec2(
            vertice.x * scale,
            vertice.y * scale
          ))
        }
        body.CreateFixtureFromShape(shape, 0.5)
      }
      body.childName = 'penguin-' + (i + 1)
      body.SetTransform(new b2Vec2(-15+i*4, 30), 0)
      body.SetLinearVelocity(new b2Vec2(0,0))
      body.SetAngularVelocity(0)
    }
  }
Below is Penguin.js which extends THREE.Sprite
import { Sprite, TextureLoader, SpriteMaterial, RepeatWrapping } from "three";
import { b2Vec2 } from "./liquidfun/ExternalsResolver";

export default class Penguin extends Sprite {
  constructor() {
    const map = new TextureLoader().load(
      require("./../assets/penguin.png"),
      (texture) => {
        // flip the texture vertically to match our geometry
        texture.wrapT = RepeatWrapping;
        texture.repeat.y = -1;
      }
    );
    const material = new SpriteMaterial({ map });
    super(material);
  }

  draw(body) {
    const position = body.GetWorldCenter();
    const angle = body.GetAngle();
    // if the body is out of the screen we move it back to the top
    if (position.y < -25) {
      body.SetTransform(new b2Vec2(0, 30), 0);
      body.SetLinearVelocity(new b2Vec2(0, 0));
      body.SetAngularVelocity(0);
    }
    this.position.x = position.x;
    this.position.y = position.y;
    const imageSize = {
      width: 243,
      height: 111,
    };
    const scale = 0.015;
    this.scale.set(imageSize.width * scale, imageSize.height * scale, 1);
    this.material.rotation = angle;
  }
}
The constructor takes care of loading the image asset of the Sprite.
The draw method only takes care of moving the transform of the simulation onto the sprite, as well as resetting the body position if it felt below -25
Finally on our main class Stage we add the penguins to the foreground layer:
for (let i = 0; i < this.settings.numberOfPenguins; i += 1) {
  const name = `penguin-${i + 1}`;
  const penguin = new Penguin();
  this.penguins[name] = penguin;
  this.sceneForeground.add(penguin);
}
And that’s about it for the penguins, Box2D takes care of everything for us!
4 - Liquid Particles
Next we want render a water like fluid. To achieve this effect we use the ParticleSystem provided by Box2D to create the base behavior, then we use a different rendering technique in order to make it look more watery.
First we define a particle pool. Each particle shares the same radius. The number of particles is defined by the surface area, aka shape defined. In this example, the bigger the spawnArea.radius the more particles will be created.
 makeLiquidParticles (spawnAreaRadius = 2, liquidColor = [160, 110, 240, 255]) {
    const psd = new b2ParticleSystemDef()
    psd.radius = 0.07
    const particleSystem = this.world.CreateParticleSystem(psd)
    const spawnArea = new b2CircleShape()
    spawnArea.position.Set(0, 30)
    spawnArea.radius = spawnAreaRadius
    const particleGroupDefinition = new b2ParticleGroupDef()
    particleGroupDefinition.shape = spawnArea
    particleGroupDefinition.color.Set(...liquidColor)
    particleSystem.CreateParticleGroup(particleGroupDefinition)
}
Because the number of particles is defined by the spawning surface area, we get the position buffer after the pool creation and get its length, which didved by 2 gives us the number of particles:
const numberOfParticles =
  world.particleSystems[0].GetPositionBuffer().length / 2;
Now using this value, we match the buffer length on WebGL side as we create ou instanced geometry in Three
Instanced geometries are an efficient way of managing the same geometry multiple times via different instances. It’s your perfect tool for rendering particles.
And guess how these particles store their data… using buffers.
-
offsetis a 3 components buffer (x,y,z) -
coloris a 4 components buffer (r,g,b,a) -
scaleis a single component buffer
// create an instanced buffer from a plane buffer geometry
const geometry = new InstancedBufferGeometry();
geometry.copy(new PlaneBufferGeometry(1, 1, 1, 1));
// Add/generate attributes buffers for the geometry
const offsets = [];
const colors = [];
const scales = [];
for (let i = 0; i < numberOfParticles; i += 1) {
  offsets.push(0, 0, 0);
  colors.push(0, 0, 0, 0);
  scales.push(0.6);
}
geometry.setAttribute(
  "offset",
  new InstancedBufferAttribute(new Float32Array(offsets), 3)
);
geometry.setAttribute(
  "color",
  new InstancedBufferAttribute(new Float32Array(colors), 4)
);
geometry.setAttribute(
  "scale",
  new InstancedBufferAttribute(new Float32Array(scales), 1)
);
The rest of the code in LiquidParticles.js initializes a custom shader to render each particle as a circle with opacity fading from center to outside.
This initial pass is not so useful yet, the output is a blurry mess.
The next step is more interesting as it consist in processing the output to convert it into a cartoony looking water.
The steps of this next pass shader are fairly straightforward:
-
If the cumulated opacity is below
0.35threshold: discard the pixel -
Then if opacity is below
0.45threshold: it’s foamy water, paint the pixel white -
Else it’s water, paint the pixel blue
Below is the interesting part of our fragment shader in LiquidShader.js
uniform sampler2D tDiffuse;
varying vec2 vUv;
void main() {
  vec4 sample = texture2D(tDiffuse, vUv);
  if (sample.a < 0.35) {
    discard;
  }
  if (sample.a < 0.45) {
    gl_FragColor = vec4(1.0);
  } else {
    gl_FragColor = sample;
  }
}
And if the idea is still a bit confusing, here is the same concept illustrated in Photoshop with the magic selection tool.
5 - Composition and post processing
Along the article you may have noticed we have multiple scenes, indeed we have 3 that we use as layer:
-
Background
-
Liquids Layer
-
Foregroung
Using THREE.EffectComposer allows us to apply specific effects to specific meshes, for example the liquid particles are the only mesh being post processed by the LiquidShader
this.composerLiquid = new EffectComposer(this.renderer);
this.composerLiquid.addPass(renderPassLiquid);
this.composerLiquid.addPass(this.effectLiquid);
this.composerLiquid.addPass(liquidCopyPass);
The last layer of composer is the foreground and in our demo is responsible for blending all the outputs from previous passes together in LayersBlendShader.js
vec4 background = texture2D(textureBackground, vUv);
vec4 liquid = texture2D(textureLiquid, vUv);
vec4 foreground = texture2D(tDiffuse, vUv);
vec3 color = background.rgb;
color = mix(color.rgb, liquid.rgb, mix(liquid.a, foreground.a, 0.5));
color = mix(color.rgb, foreground.rgb, foreground.a);
float alpha = max(max(background.a, liquid.a), foreground.a);
gl_FragColor = vec4(color, alpha);
Hope you enjoyed this tutorial, if you have any question or comment, please use the section below or reach out on twitter. Enjoy!