In this tutorial you'll learn how to create video-like animations, using WebGL fragment shaders and HTML canvas.
This is the second part of a series of 4 articles - if you jut landed here you may want to start there instead
The Hulu example is great to begin with as it only contains a single color and its shapes are not too complex to be replicated in a shader.
Define primitives
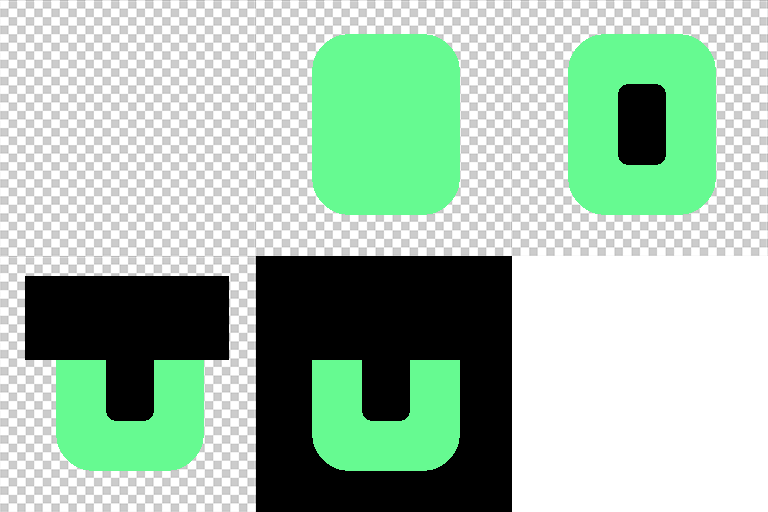
The first step is to understand how to draw primitive shapes. By superposing, masking and composing them together we can create more complex shapes.
For this example we only need to use two primitives:
- rectangles (could be square or not)
- rectangles with rounded corners
We first need to define them as functions:
// from https://thebookofshaders.com/07/
float square(in vec2 _st, in vec2 _size){
  _size = vec2(0.5) - _size*0.5;
  vec2 uv = smoothstep(_size, _size+vec2(0.001), _st);
  uv *= smoothstep(_size, _size+vec2(0.001), vec2(1.0)-_st);
  return uv.x*uv.y;
}

// from http://www.iquilezles.org/www/articles/distfunctions/distfunctions.htm
float roundBox(vec2 pos, vec2 bounds, float radius) {
  return 1.0 - smoothstep(0.0, 0.005, length(max(abs(pos) - bounds, 0.0)) - radius);
}
These operations allows us to define whether the pixel is inside the shape or outside, returning 1.0 for inside and 0.0 for outside. The smoothstep(min, max, val) to define the a gradient surface versus defining sharp edge.
Let's look at how to use it next.
Draw a rectangle
To draw a rectangle we'll use the square method defined above. First get the value in a float, them multiply it to the color we want to apply.
For example to draw the letter l of Hulu, we just need to create a green rectangle with a higher scale.y and thin scale.x, so it s thin and tall.
vec3 drawLetterL (vec2 st) {
  float box = square(st + vec2(0.0, -0.27), vec2(0.16, 0.75));
  vec3 color = vec3(box);
  return color;
}
Ok that was simple one, next we look into how to combine multilpe shapes to create more complex ones.
Draw more complex letters
Now let's step it up a bit and look into subtracting shapes, a technique also referred to as masking.
In order to draw a U we follow these steps:
- draw a rectangle with rounded corners,
- draw a smaller one in the middle and subtract it from the initial one,
- crop the top by subtracting a wide rectangle.

In GLSL it looks as follow:
vec3 drawLetterU (vec2 st) {
  vec3 color = vec3(0.0);

  // main base
  float box = roundBox(st - vec2(0.5, 0.75), vec2(0.125, 0.2), 0.15);
  color = vec3(box);

  // mask inside
  box = roundBox(st - vec2(0.5, 0.74), vec2(0.05, 0.12), 0.05);
  color = mix(color, vec3(0), box);

  // crop the top
  box = square(st + vec2(0.0, -0.55), vec2(0.6, 0.4));
  color = mix(color, vec3(0), box);

  return color;
}
Notice how when blending layers it's common to use mix(value1, value2, control).
So we know how to make a l and just looked at how to make a u. Can you guess how we could further combine these shapes to create the missing h letter?
From there it's up to your imagination, see how far modern heroes are taking it
Animation Timing
If you've read part 1 of this series you may recall our shaders are setup with a uniform of type float u_time binded with the slider value with a range of 0 to 10.
We use this u_time value to control our animation. In order to get there we need a way to map the current time to a specific desired value.
For example we want to be able to write a command for setting the alpha from 0 to 1, starting at 3 seconds and fully visible at 4 second in the timeline.
float mapTime (float from, float to, float time) {
  return clamp((time - from) / (to - from), 0.0, 1.0);
}
With the function and the use case described above, it would translate to something like:
float alpha = mapTime(3.0, 4.0, u_time);With these basic tools in hand, we can start thinking more creatively combining shapes and time.
So that's the basics, in the
next articlewe'll dig into the same topics with a bit more depth.
Hope you enjoyed this tutorial! The stuff I write about is a way for me to improve my learnings - probably just like you right now. So please if you catch any issue or want to suggest an edit, use the section below or reach out on twitter. Cheers!

